WYFY is a local IoT (Internet of Things) company that is focused on bringing quality, designed in Singapore IoT products with local certifications to the Singapore and Southeast Asian markets.
They have three products right now, WYFY Panel, WYFY Beam, and WYFY Mist.
I have gotten the WYFY Beam from Automate Asia. The usual retail price is S$49, but Automate Asia is having a discount and selling it for S$39.
WYFY Beam is a smart IR blaster that is connected to your home network via wi-fi. At the moment, WYFY only officially supports Google Home since it is already available in Singapore.
Unboxing


The box content includes the WYFY Beam, USB Micro cable, Adhesive pad, and printed QR code to download the WYFY app.

Specifications
- Wireless Technology: WiFi a/b/g/n 2.4Ghz
- Dimensions: 50 x 50 x 20 mm
- Power Input: 5V/1A
- Infrared Range: 8m
- Infrared Frequency: 38 Khz


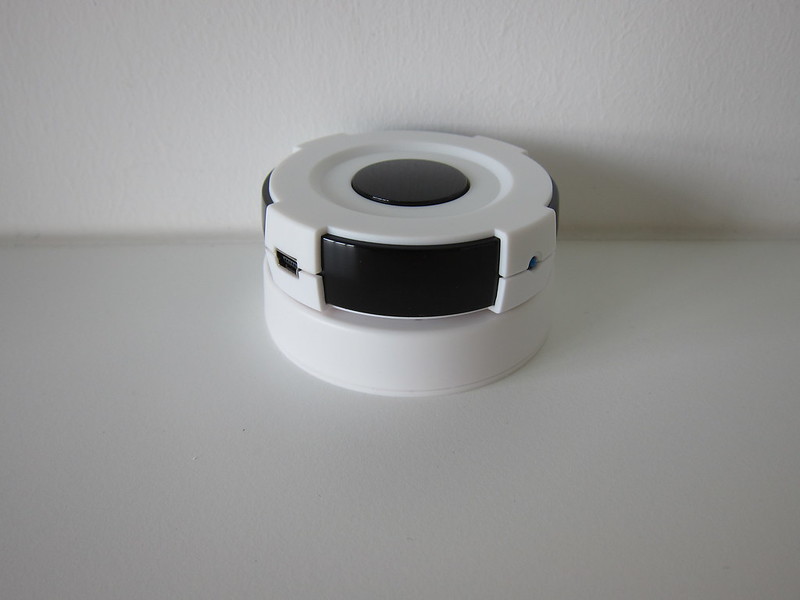
It has a front micro USB port for charging.

The matte black finish and compact design will blend straight into your TV console.

Setup
The WYFY app is available on both iOS and Android.
A lot of searches mistaken WYFY as a typo for WiFi, and hence, finding the app or company on Google, App Store, Play Store is very challenging.
The WiFi LED indicator will blink when it is in setup mode. Once it has been set up and connected successfully to your house’s wi-fi network, the LED indicator will not light up.

After registering an account with WYFY and creating a home with the room names you wanted, you can proceed on to add the WYFY Beam.


Once the app managed to detect the WYFY Beam, you will need to tap on “Configuring WiFi” and fill in your house’s wi-fi password. It will then proceed to configure the WYFY Beam to connect to your house’s wi-fi network.
I have no idea without Bluetooth, how does WYFY send the wifi credentials over to the WYFY Beam.


If you notice in the above screenshot, I named the device, Aircon. I thought I could only use the device to control one appliance, which in this case, I intend to use it to control my air conditioner.

I later found out that I can use it to control multiple appliances, and hence, I then renamed it to Smart IR to better reflect the device.
The WYFY Beam is said to contain more than 20,000 built-in IR commands of home appliances.
I love the WYFY app on iOS. All the screens are very responsive to taps and the transitions between screens are smooth as well.
Setup – Air Conditioner
At home, I am using the Mitsubishi Electric Starmex air conditioner, and in WYFY Beam, there are 43 IR profiles for it. To my surprise, all the controls work on the first profile.


The WYFY Beam will not synchronize any signals from the air conditioner remote. So if you switch on your air conditioner using the provided remote control, WYFY Beam will still indicate the air conditioner as being switched off.
Setup – Fan
When it comes to setting up the fan, I am not so lucky. I am using EuropeAce, which is a local home appliance brand. There are only three profiles for it, and none of them works for my fan.

There is a device type called DIY, which allows WYFY Beam to capture the signal from your remote control and repeat it so that the home appliance will work with the WYFY Beam.
After selecting DIY, you can choose what type of device it is. In my case, it is a fan, and they will show you a Fan UI in the app.


The learning UI is intuitive; just long-tap any of the buttons in the Fan UI, and you will have 30 seconds to press on the remote control. The button on the app will be mapped to the button you press on the remote control.


After seven buttons, you are done.


Automation
Under the Smart tab of the app, there are two sections, Automation, and Scenario.
Automation is self-explanatory. There are four components to that, Condition Type, Condition, Action, and Effective Period.


Condition Type controls whether this automation requires any or all the conditions to be met. You can choose from seven types of conditions, Temperature, Humidity, Weather, Sunset/Sunrise, Wind Speed, Schedule, and Device.
Some of the conditions are from external weather sources like temperature and humidity, as WYFY Beam can’t measure those.
I choose Schedule as my condition is related to time.


Action is the action taken when the conditions are met. There are four types of actions, Execute Scenario, Enable or Disable Automation, Send Notification, Time-lapse, and Device.
I chose Device because I want to switch off my device after a specific time.
Effective Period is essentially when this automation will be executed. You can select weekends only or every day.


My automation switches off the air conditioner at 8 am every day.

Scenario
I would consider Scenario something like quick actions. You can use it to execute single or many actions at once.


Rather than going through a few taps in the app to switch on the fan, you can create a scenario that switches on the fan and show the scenario on the app’s home page.


You will need one tap. Tap on the Scenario, and it will switch on your fan.

Google Home
Pairing with Google Home is also straight forward. Just click on the “+” sign in Google Home app and choose “Have something already set up” under Works with Google.
Scroll down the list till you see WYFY.


After authenticating with WYFY, you will be able to link the devices that have been set up under the WYFY Beam.
On the Google Home end, the profile of the devices is also mapped correctly.


Asking Google to switch on or off devices controlled by the WYFY Beam is responsive. No complaints in that department.
Settings


Although Alexa is stated in settings under More Services, you will not be able to find the WYFY Alexa Skills on Alexa Skills Store as Alexa is not officially available in Singapore.


Conclusion
WYFY Beam makes your dumb IR devices smart by allowing them to be controlled on the WYFY app and thus allowing automation and the linking to platforms such as Google Home and Amazon Alexa.
Most if not all households will have a dumb IR device, be it a fan, television, media player, or air conditioner. Priced at S$39, the barrier of entry is low enough to get users started (hooked) on their smart home journey.
For the seasoned users, at S$39, I think it is cheap enough to get one for each room in your home so you can start adding those dumb IR devices into your smart home ecosystem.
Is this able to tell the aircon to “turn off after 1 hour” like how we can set it on our Daikin Remote? Or would it involve learning the IR beam from the remote and replicating it as a repeated IR beam? The Daikin Remotes seem to send unique IR beams for all parameters, i.e. the bean for say 25 degrees + Turn off after 1 hour is different from 24 degrees + turn off after 1 hour.
You will need to check whether your modal is supported in the list. If it is not supported, you will probably need to learn the command. My aircon doesn’t have the feature to turn off after an hour. I am using Ambi Climate to control my aircon mostly. I am using this to on my fan since it is a dumb fan.