Ray-Ban Meta Wayfarer Review
Ray-Ban Meta Wayfarer is probably an impulse buy because I saw an offer that is too good to resist over at r/RayBanStories.
Using coupon code 3008997, I got a 35% discount on the Ray-Ban Meta Wayfarer on the official ray-ban.com website. The discount varies depending on what model you choose.
I chose the Ray-Ban Meta Wayfarer in Matte Black with Clear/Graphite Green Transition Lens. The retail price is US$379 (S$502), and after the 35% discount, it drops to US$246.35 (S$327).
ray-ban.com offers free shipping via DHL within the US but does not ship directly to Singapore.
Shipping from my freight forwarder, HopShopGo, to Singapore is US$43.31 (S$58) via DHL. GST and insurance are included.
So, in total, the Ray-Ban Meta Wayfarer cost me US$289.66 (S$384). Since Ray-Ban Meta is not officially available in Singapore, you can get it from unofficial retailers for about S$650.
Unboxing


The charging case containing the Ray-Ban Meta Wayfarer is at the center when you open the box.

The Get Started guide, Safety & Warranty booklet, and a lens cleaning cloth are hidden in the “Meta View App” flap.


Charging Case
The charging case is beautifully designed, and I love it. It modernizes the classic retro-looking Ray-Ban case and makes it into a smart charging case.


The LED indicator, which looks like a button in front of the case, tells you the charge level of your glasses. When you remove the glasses from the case, the case’s charge level will be shown.

At the bottom of the case is the USB-C port that charges the case.

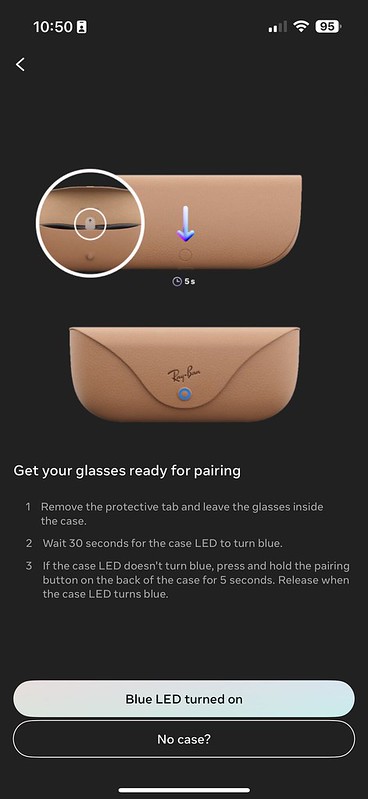
Behind is a button for you to put the glasses into pairing mode.

The charging case charges your glasses via the contact point at the top of the nose pad.


It weighs 133g and gives your glasses 36 hours of usage. It does 50% charge in 20 minutes.

Design
I chose matte black with a clear/graphite green transition lens.
At first, when you look straight at the glasses, you will think that there are two cameras on the end pieces. But no, there is only one.

The 12MP ultra-wide camera will be on your left end piece (right from the photo below), while the capture LED is on your right end piece (left from the photo below).

For privacy reasons, whenever you are taking a photo or recording, the capture LED light will be lit to let people know you are recording or taking a photo.
The photo resolution will be 3024 x 4032, while the video resolution will be 1080. The glasses have 32GB of internal storage.
At the end of each temple is a custom-built speaker with two microphones, one at the top and one at the bottom.

There are five microphones, with the last being on the nose pad.

The right temple has a touchpad on the outside and a capture button at the top. You can use the touchpad to play/pause music and increase/decrease volume.


The left temple has a power switch on the inner side.

In terms of connectivity, the glasses have Wi-Fi 6 and Bluetooth 5.2.
Setup
Setup is done using the Meta View app on iOS or Android.

Once you remove the protective tab, the case LED will be blue. You have to leave your glasses in the case while pairing.
You should be able to connect to the glasses.

After connecting, downloading and installing the latest firmware updates will take about 15 minutes.

That’s it, it is pretty straightforward.

Features
I went through various options to familiarize myself with the features.

I first connected everything to the glasses: WhatsApp, Messenger, Instagram, and Facebook.

Since it can play music, I connected it to Apple Music since I am a user of Apple Music.

You can customize the tap-and-hold gesture to start a music app like Amazon Music Play Now, Apple Music, or Spotify Tap or issue a voice command. I chose the latter.
I leave the capture button at the default, pressing once to take a photo and pressing and holding to start recording a video.

As mentioned earlier, you cannot turn off the notification LEDs for privacy, but you can adjust the brightness.

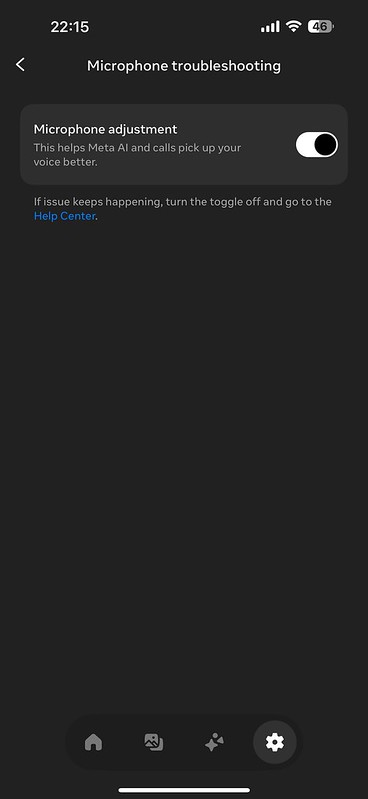
After the setup, I could not get the voice control to work despite enabling the microphone adjustment. However, restarting the glasses by toggling the power switch works well. It scared me, as I thought I received a faulty unit.

In Singapore, Meta AI is supported. You must change your iOS language from English (Singapore) to English (US) to get it.

Usually, after taking photos with your glasses, you must manually import them to your iOS Photos app by connecting to glasses wi-fi networking and downloading it. Alternatively, you can enable this option.

As long as your glasses are charging and connected to a saved wi-fi network, it can automatically import it.

Using It
Photos taken with glasses are generally clear, especially if they are taken outdoors on a bright and sunny day. However, indoor shots tend to be saturated.
Here are some photos taken using the glasses:


Photos taken at night are decent as well:


The voice commands work well in a relatively quiet environment. You can use voice commands like:
- Hey Meta, Take A Photo
- Hey Meta, Take A Video
- Hey Meta, Take A Photo And Send It To Instagram
- Hey Meta, Take A Video And Send It To Instagram
- Hey Meta, Scan This QR code
- Hey Meta, What Is The Battery Level
The media can only be photos for hands-free operation posting to Instagram Stories. For videos, when you say, “Hey Meta, Take A Video And Send It To Instagram,” it will record a 15-second clip, and you have to use your phone to send it manually.
60 seconds is the default video duration when you say, “Hey Meta, Take A Video.” Alternatively, you can change the duration in the settings to 15 seconds, 30 seconds, or 3 minutes.

Scanning QR codes with the glasses works by saying, “Hey Meta, Scan This QR code,” the link will be sent to your MetaView app.

If you have Meta AI-enabled, you can do the following:
- Hey Meta, What Am I Looking At
- Hey Meta, Look And Tell Me What Plant Is It
- Hey Meta, Look And Tell Me What Animal Is It
- Hey Meta, Look And Tell Me More About This Landmark

However, despite having five microphones, it fails to pick up my voice commands in a noisy environment. Again, you hardly can hear the speakers in a loud environment, even at maximum volume.
However, in a moderately quiet environment, if you are listening to music via the glasses, the person sitting beside you can hear it.
Conclusion
The Ray-Ban Meta Wayfarer works perfectly in a relatively quiet environment, and I love its hands-free operations. However, the chances of you using the glasses at home or office where the environment is quiet are low. You will generally want to use it outside, which means the environment might be noisy. So your results might varies.
In those environments, you can only rely on the capture button to capture photos or record videos. You cannot post it to Instagram or Facebook as you need to issue voice commands, which the glasses cannot pick up.
Meta can still improve on it by having more customization to the touchpad, like double tap or triple tap, to trigger an action. For example, if I triple-tap the touchpad, it will take a photo and send it to my Instagram. This way, I don’t need to rely only on voice commands to do it.
If you are having earphone fatigue, the speakers of the glasses are a good alternative for listening to music. Just be conscious of the noise level in your environment so as not to disturb others since it is an open-ear design.
The use case for me is to use it as regular sunglasses since it has a transition lens, and I can use it to capture the moment when needed. Pressing the capture button on my glasses is quicker than taking out my phone to take a photo. Once the moment is captured, I can use my phone to do what is required.
Meta AI integration with the glasses is futuristic and has potential. It will be helpful when you are traveling. You can always say, “Hey Meta, Look And Tell Me More About This Landmark,” instead of taking a photo with your phone and doing a reverse image search on Google to learn about it.

I use it daily for my 6-day Shanghai trip. I love the convenience of taking a photo and recording short clips with a button instead of taking out my phone from my pocket to do the job. I rarely use Meta AI at all during the trip because the environments I am in are always noisy. After taking ten photos and ten videos during a 6-hour duration, the battery has about 30% remaining. No Meta AI was used at all during this duration.